Before you begin
- You'll need to have reserved the use of the room from the School of Social Work Front Desk, room 220A.
- Know ahead of time if you need to use the room to:
- Project content to the TVs
- Use the Zoom Device at the instructor station
- Use the cameras & ceiling mics with zoom or panopto
- Advanced use:
- Use the pods in the room to create additional hybrid breakout rooms
How to use the A/V system in The IPE Classroom
Jump To:
- Orientation to the Instructor Station
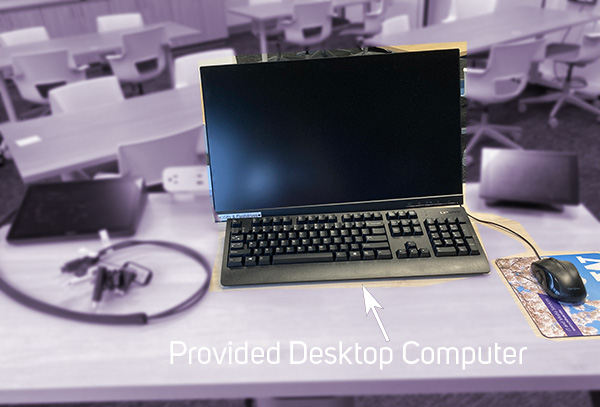
- Using The Provided Desktop Computer
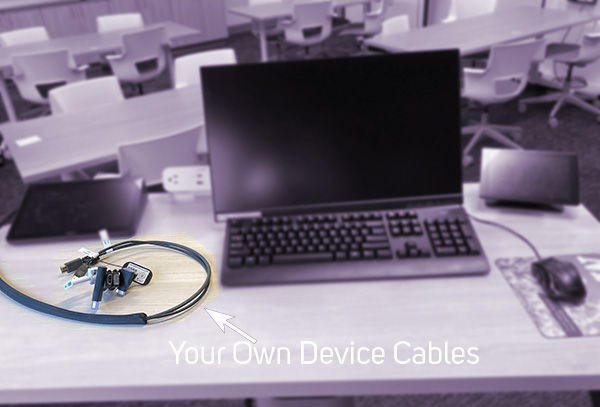
- Using Your Own Device
- Control Room Sound
- The Microphones
- The Cameras
- Advanced: Dividing the Room's Screens
- Advanced: Using the Pods
- Using The Zoom Device
- Advanced: Using The Wireless Display
- Troubleshooting & Tips
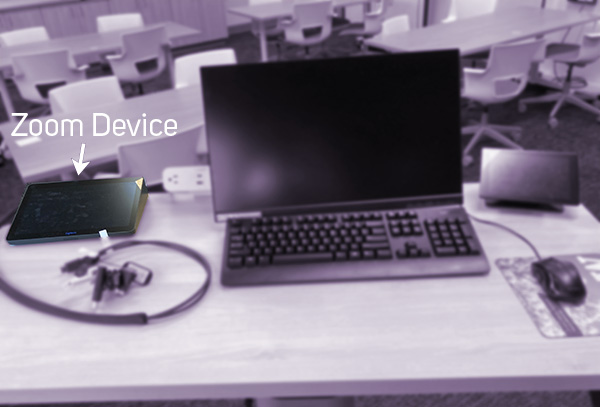
Orientation to the Instructor Station
The main control of the room is accomplished at the instructor station.
- The instructor station has four main parts from right to left:
- The zoom device
- For Hosting or Joining Zoom sessions without having to use your device, or the provided desktop:
- For Hosting or Joining Zoom sessions without having to use your device, or the provided desktop:
- Cables to plug your own devices into:
- The provided desktop:
- The main control panel:

- The zoom device
- Then there are
- the microphones in the ceiling, you can walk all around the room and speak freely, and the system will hear you.
- The cameras on the north and south walls
- There is a Wireless Display to show other device screens, without plugging in any cables.
- The five pods for integrating on-site small groups with discrete zoom breakout rooms, using zoom ( advanced )
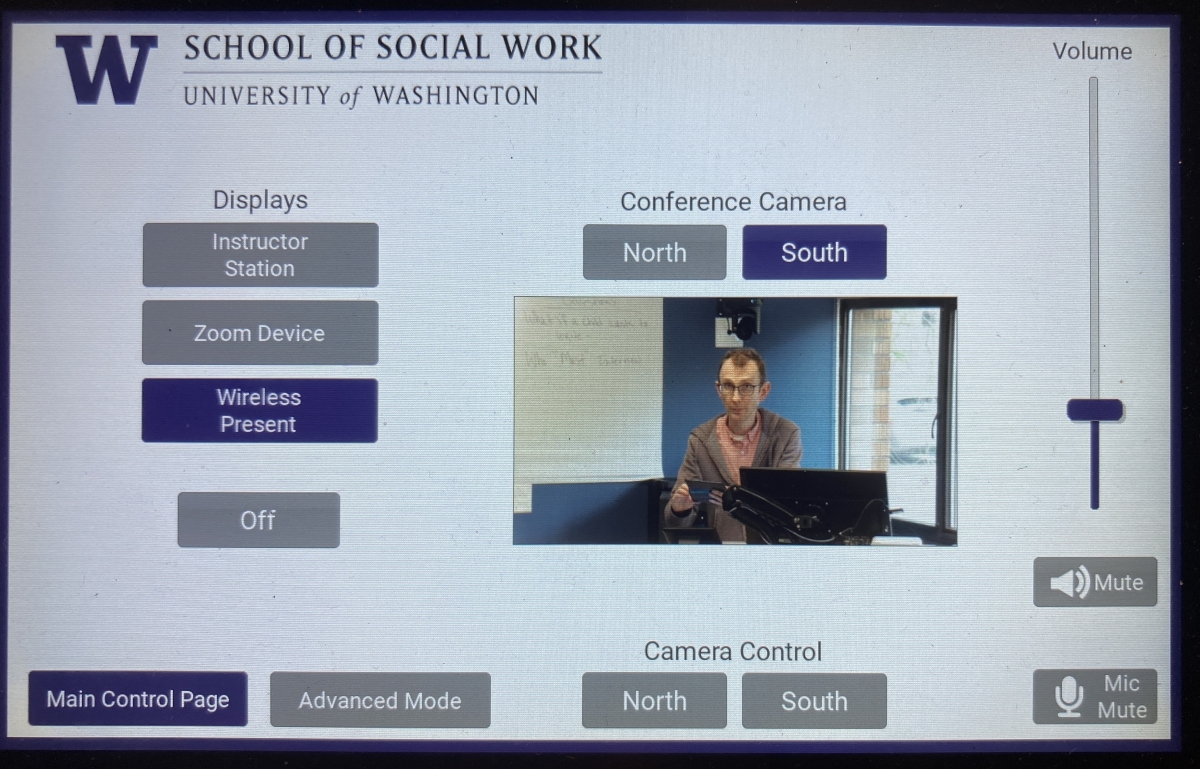
If you use the Provided Desktop Computer you will be able to:
- Display Powerpoint windows & share screens via zoom as normal
- AND
- Route the ceiling microphone signals directly into Zoom/Panopto
- Route the Built-in Cameras in the IPE Classroom to Zoom/Panopto as your web camera
The computers in the podiums should always be powered on. But, if they have gone to sleep:
- Wiggle the Mouse
- OR
- Touch a key on the keyboard to wake up the computer
If the display is still dark - Turn on the power to the display:

If you've confirmed the monitor is on & the computer is still dark. Please let
sswtech@uw.edu
know or go to room 12 on the G level, so that we can start the computer for you.
Log in with your UWNETID
The computer's are automatically connected to the wireless network so once you're logged in - you can check email go to google drive/One drive etc.
But if you'd like to physically load files on to the computer, look for the USB ports on the back left corner of the monitor as seen here:

Examine your device to determine which output plug shape your device uses & use one of the adapters on the adapter ring, if necesary.
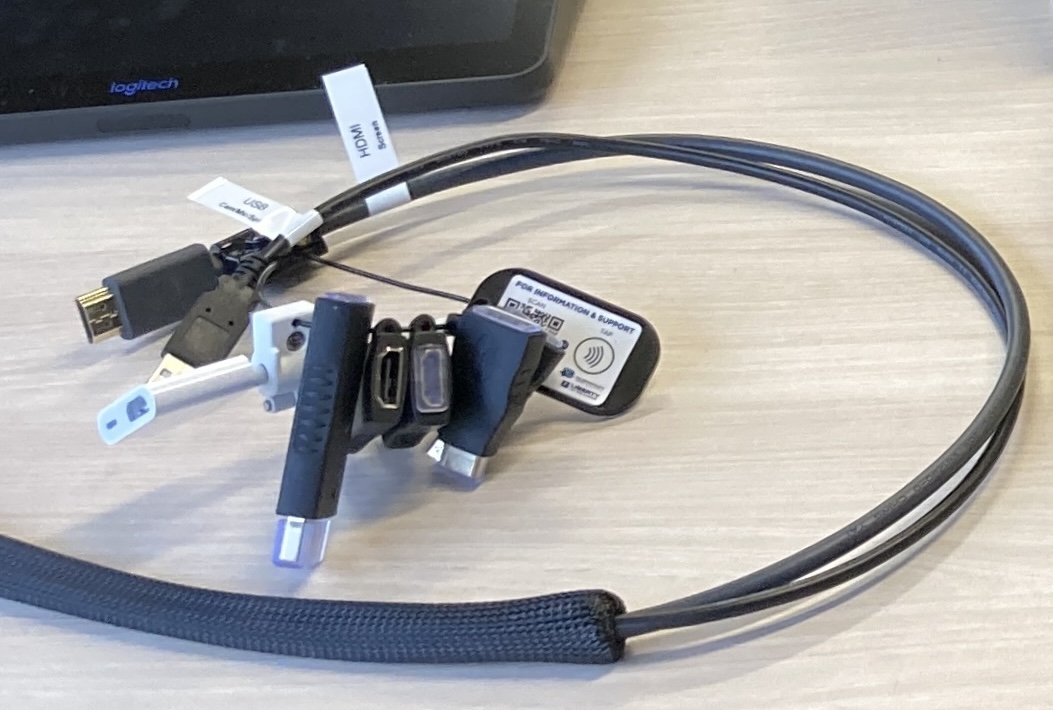
If you do need an adapter. plug the HDMI input to the HDMI cable, then adapted end into your device.
If you don't need an adapter Plug in your device to the HDMI cable with HDMI label directly into the HDMI port of your device.
The system will auto detect that you want to use your device & switch the displays and audio from the Provided Desktop to your device
Then Plug in the USB cable to the USB port of your device to gain access to the Ceiling Mics, Cameras & Speakers.
Choose "AV Bridge" as your camera, mic & speaker in Zoom, Panopto, or other a/v app.
- To switch the system back to paying attention to the provided desktop:
- Unplug the cable from your device AND ANY ADAPTER, if used.
to control the level of the provided desktop computer's (or your device that's connected to the HDMI cable) volume in the room:
- Move the slider under the label "Volume" to your desired volume & Mute/Unmute as seen here:
- The audio will come out of the ceiling speakers all around the room.
- pro-tip! a youtube's video in this room has 3 volume sliders that can be set at different levels. Putting
- & then using the control panel's "Volume" to control the volume is an easy way to control the volume reliably.
- the windows volume at 100%
- the youtube video window player's volume at 100%
There are two ambient mics built into to the celing of the IPE Classroom as shown here:
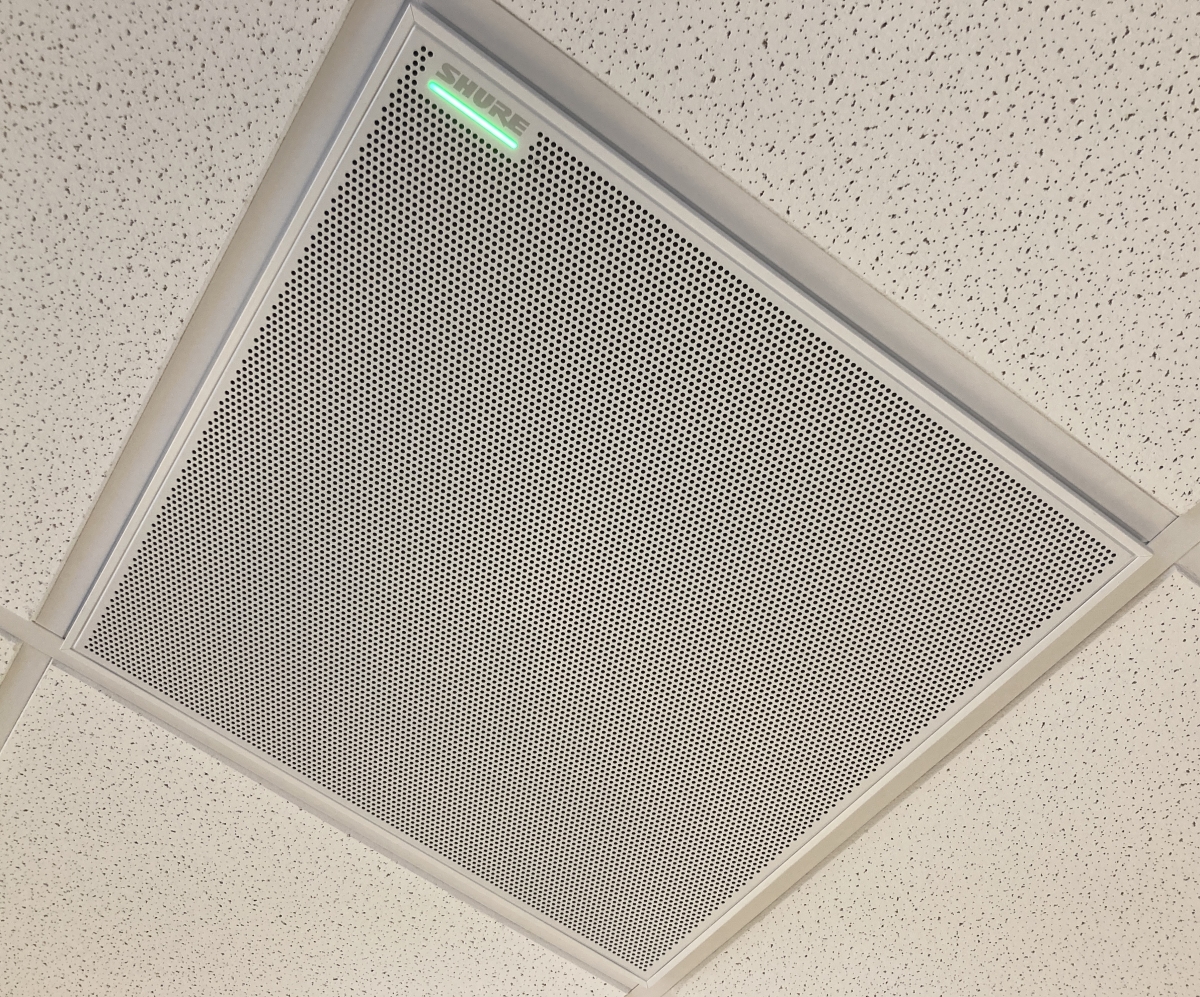
These mics will pick up anyone's voice & send it to Zoom/Panopto. You don't have to be facing the mics for them to work. But do keep in mind that voices in the back of the room will also be picked up as well.
To use the mics Make sure "A/V Bridge" is selected as the microphone source in Zoom or Panopto.
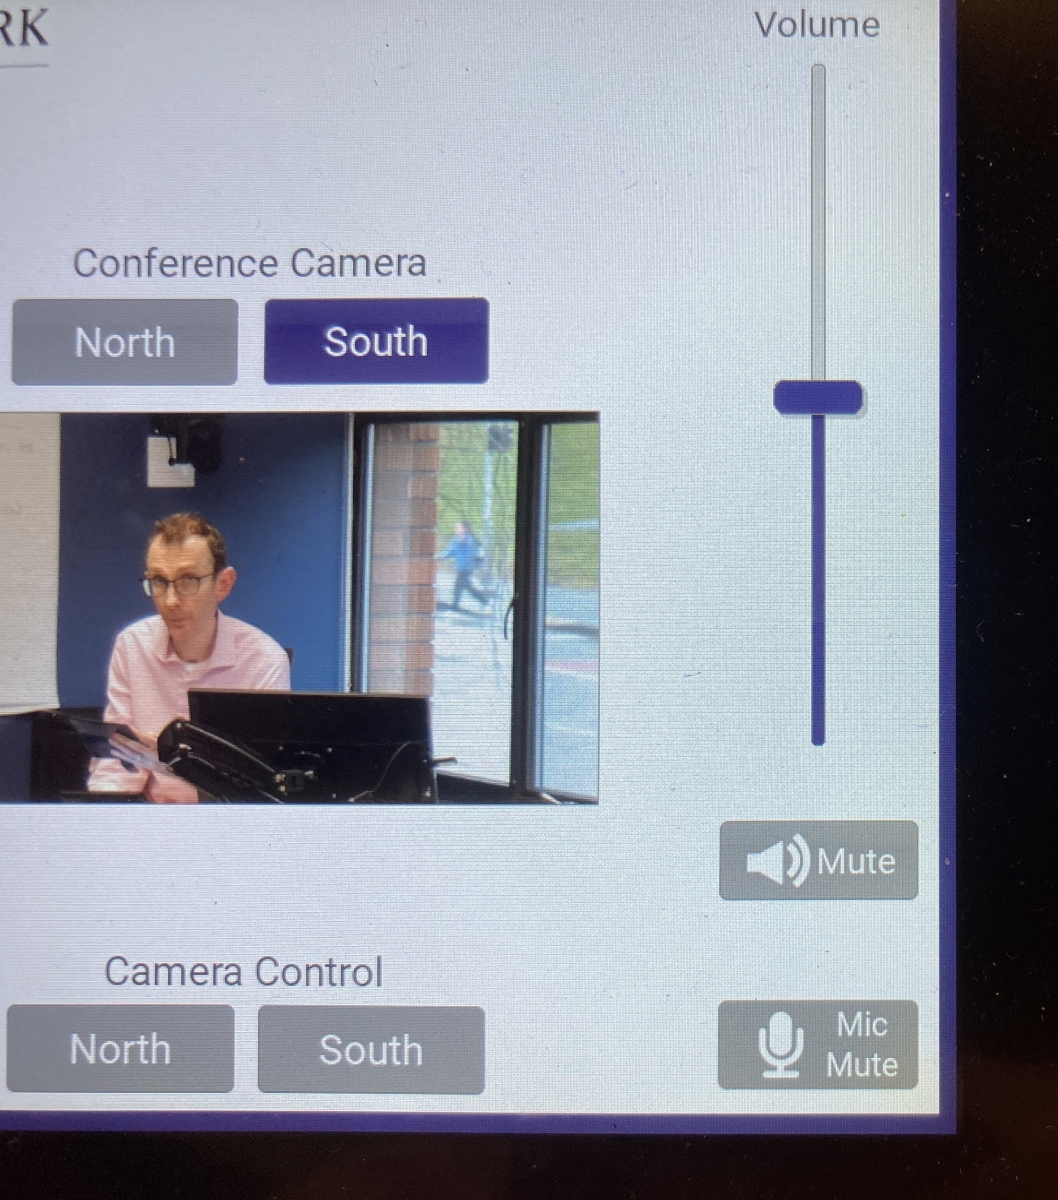
USING THE BUILT IN CAMERAS IN IPE Classroom
You can use 2 built-in cameras in the IPE Classroom as web cameras for Zoom or Panopto to show the presentation area, or the audience.
Choose "AV bridge" as your camera source in Zoom or Panopto or other program you are using, on the provided desktop or on your device via the USB cable.
Then, select
North
or
South
Under the heading of "Conference Camera" on the main page of control panel as seen here:
To adjust the camera angle of a particular camera, touch the corresponding button at the bottom of the control panel to bring up it's control page, as seen here:
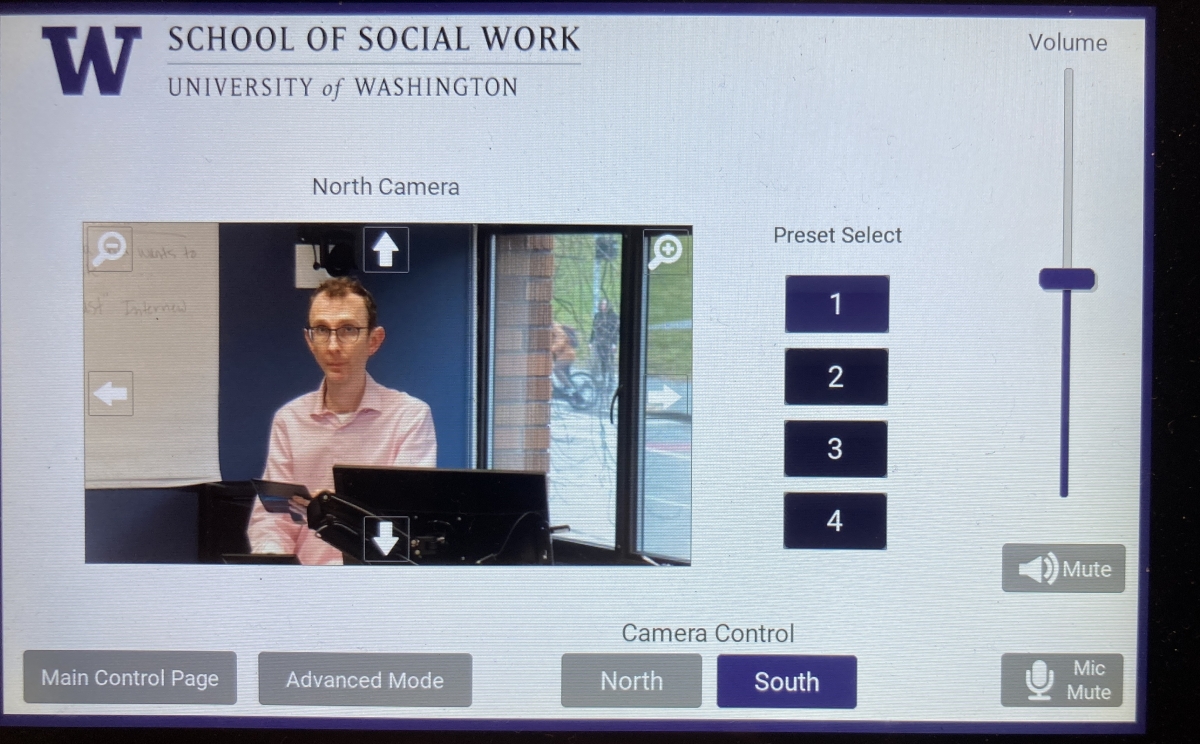
and here:

To select one of the preset camera angles, press the 1,2,3, or 4 buttons.
To temporarily further fine-tune that preset camera angle to your liking:
- You can press the UP, DOWN, LEFT, RIGHT, ZOOM IN, ZOOM OUT button on the preview of the image itself.
NOTE:
- Switching between North & South cameras takes approximately 3 seconds
Advanced: Dividing the Room's Screens
(TBD)
(TBD)
Advanced: Using The Zoom Device
(TBD)
Advanced: Using The Wireless Display
(TBD)
+++
The input box on the podium auto-switches between connected inputs. For example:
- if your device is plugged in to the HDMI cable
- the box switches to your device.
- If it's unplugged
- it switches back to the provided desktop.
- HOWEVER:
- if there is an HDMI to another type of plug adapter plugged in, the system thinks a laptop is STILL plugged in & won't switch back to the provided desktop
- The system will be showing a total black screen with no logo.
- so you'll need unplug any adapter to make the system switch back to the provided desktop.
- if there is an HDMI to another type of plug adapter plugged in, the system thinks a laptop is STILL plugged in & won't switch back to the provided desktop
+++
Users can easily stop sending signal to any other screen. So if the system is showing the "Aurora VLX" screen AND there's no adapter plugged into the laptop HDMI cable,
- Press the Windows + P keys at the same time to bring up the projector options
- & choose "duplicate" or "extend", depending on your goals.
+++